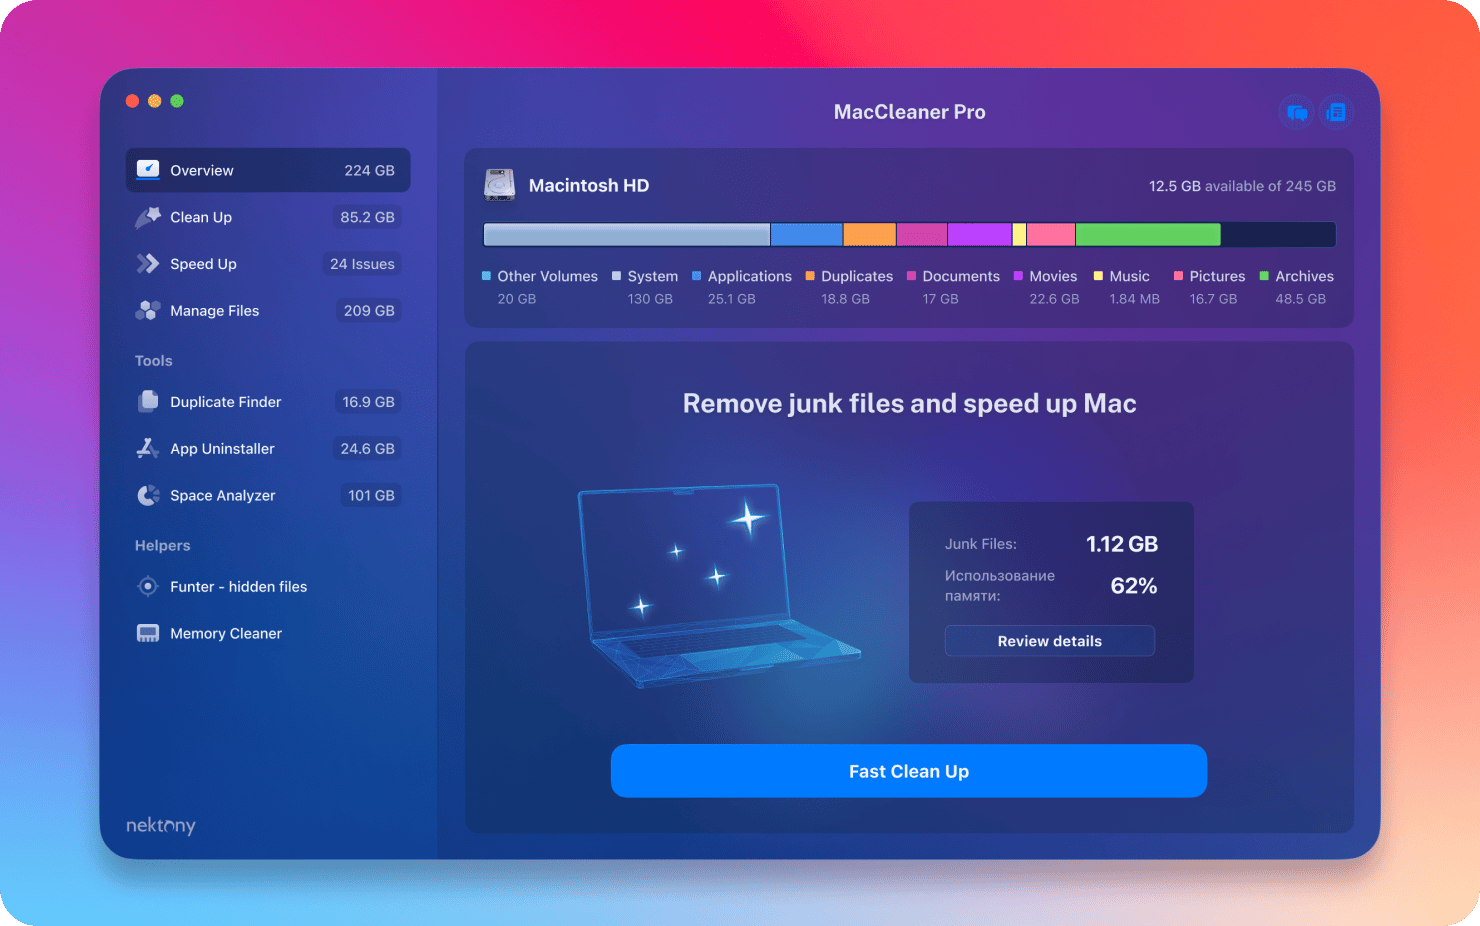
MacCleaner Pro is a professional Mac cleaning tool suite software,Keep your Mac fast、clean and orderly,Helps you see what's taking up the most space on your Mac,Unnecessary files found,and reclaim hard drive space。It can clean junk files in one click、Optimize RAM、Manage extensions and fix issues,Make your Mac run faster。MacCleaner Pro is packed with features,For example cleaning invalid RAM memory、Disable startup programs、Reindex Spotlight and Mail、Remove unnecessary plugins and extensions、Close memory-intensive apps、clear cache、Delete installation files and unnecessary localization files, etc.。also,MacCleaner Pro also offers several additional tools,Such as App Cleaner & Uninstaller、Duplicate File Finder和Disk Space Analyzer,Help you perform deep cleaning。MacCleaner Pro user feedback is positive,Recommended by many users。
statement:All articles on this site,If there is no special instructions or markings,All are originally published by this site。any person or organization,Without the consent of this website,Reproduction prohibited、Misappropriate、collection、Publish content from this site to any website、Books and other media platforms。If the content on this site infringes upon the legitimate rights and interests of the original author,You can contact us for processing。
Can free downloads or VIP membership resources be used directly for commercial use?
The copyright of all resources on this site belongs to the original author,The resources provided here are for reference and study purposes only.,Please do not use it directly for commercial use。If copyright disputes arise due to commercial use,All responsibility lies with the user。For more instructions, please refer to VIP introduction。
It prompts that the download is complete but cannot be decompressed or opened?
The most common situation is an incomplete download: You can compare the capacity of the downloaded compressed package with the capacity on the network disk,If it is less than the capacity prompted by the network disk, this is the reason。This is a browser download bug,It is recommended to download using Baidu Netdisk software or Thunder。 If this situation is excluded,You can leave a message at the bottom of the corresponding resource,or contact us。
Can't find the sample image in the material resource introduction article?
For members only、Whole site source code、Program plug-in、website template、Web page templates and other types of materials,The pictures used for introduction in the article are usually not included in the corresponding downloadable material package.。These related commercial images need to be purchased separately,And this site is not responsible for(There is no way)find source。 The same is true for some font files,However, some materials will have a list of font download links in the material package.。
The download address cannot be displayed or the content cannot be viewed after payment?
If you have successfully paid but the website does not pop up a success prompt,Please contact the webmaster to provide payment information for you to process
After purchasing this resource,Can I get a refund?
Source code materials are virtual goods,replicable,Transmissibility,once granted,No refunds of any kind will be accepted、Exchange request。Please confirm before purchasing to obtain the resources you need.
Comments (0)
Note: Please be respectful and civil in your comments Cancel reply
iShot Pro is an excellent Mac、Fully functional area screenshots、Window screenshot、Multi-window screenshot、long screenshot、Screenshot with shell、Time-lapse screenshot、Quick annotation、stickers、Toriiro、screen recording、recording、OCR、Screenshot translation tool。 Function 1、Screenshot area screenshot、Window screenshots support frame selection screenshots、Smart recognition window screenshot,Customize screenshot shortcut keys。 Multi-window screenshot Press the screenshot shortcut key,Add Shift,Click multiple windows,Take multi-window screenshots。 Time-lapse full-screen screenshot Time-lapse full-screen screenshot,Support countdown sound playback,Used to capture windows that are difficult to select。 Take a screenshot of the last screenshot area using shortcut keys,Quickly take a screenshot of the last selected screenshot area。 Take a screenshot of the window under the cursor using shortcut keys,Directly screenshot the window under the current mouse,No need to activate this window。 Screenshot guide rounded corners、Shadow effect supports automatic rounding of corners in screenshots、Screenshot shadow can be colored、Size adjustment,Make your screenshots more elegant。 Quickly open the screenshot. After completing the screenshot, you can double-click Option.,Open pictures using a custom app,make your screenshot、Edit seamlessly。 The default is to use "Preview" to open the image,You can also set it to open using other apps;in addition,When selecting Finder,Is to open the Finder location where the screenshot was saved。 Save/Storage Supports saving to clipboard、Save to local. Supports saving to clipboard and local at the same time. Supports single save as.,Custom storage name and format supports HD、Two image qualities, standard definition and jpg supported、png、tiff screenshot saving format supports outputting color standard pictures 2、Long screenshot scrolling、Screenshot Select the scrolling screenshot area,Then press the "S" shortcut key,Slide up the screenshot area,Start taking long screenshots,There is no limit to the length of long screenshots。 Support automatic scrolling of long screenshots。 three、Screenshot with shell After screenshot of full screen,Match your pictures with beautiful Mac case mockups,High-end elegance。 Four、After the map supports frame selection area,Click the sticker button to sticker; The texture library will store the texture records,Supports using the shortcut key "option+s" to open the texture library,Select pictures from the sticker library for stickers; Supports right-clicking after mapping,mark、Modify sticker image。 Supports texture adjustment for transparency,Rounded corners. Supports hiding/displaying all texture windows by pressing shortcut keys. Supports fixing textures/following desktop settings. Five、Quick annotation annotation function:...
What is AirDrop? AirDrop is a wireless file transfer feature between Apple devices,Allows you to easily、iPhone、Send photos between iPads、video、Documents and other items。 How to use AirDrop: Turn on AirDrop on your Mac,Turn on the AirDrop function through the Go menu in the Finder sidebar or menu bar。 If WiFi or Bluetooth is not turned on for AirDrop,You will be prompted to turn on these features。 Send an item Drag the file or item you want to send onto the recipient's avatar displayed in the AirDrop window。 or,After selecting the file, click the Share button at the top of the Finder window,Select AirDrop,and select the recipient from the list。 When receiving an item, a confirmation box will pop up on the recipient’s device.,Ask if you want to receive an item from you。 If the recipient device is logged into the same iCloud account,Files are automatically received and stored in the appropriate location。 Notes: Make sure the AirDrop function is turned on on both devices,And both Bluetooth and WiFi are turned on。 The distance between devices shall not exceed 9 meters,Ensure good transmission effect。 Via AirDrop,You can quickly、Securely share files with nearby Apple devices,Improve work and life efficiency。 Does this content meet your needs?
When buying a Mac, many people worry about whether it is an original product.。Here are some ways to help you confirm: 1. Check outer packaging sealing film: •Original sealing film should be flat and smooth,There are three sealing lines on the left and right sides of the barcode and the lower side.。If the sealing film has been removed,There may be obvious traces or incomplete sealing。 2.Check the pores: •The original packaging will have neatly distributed air holes.,This is one of the characteristics of the original sealing film。 3. View barcode: •Real barcodes are legible,Exquisite printing,Usually black print。Barcode is one of the unique identifiers,Make sure it is consistent with Apple’s official records。 4. Confirm machine serial number: •After powering on,Click on the Apple logo in the upper left corner,Select "About this machine" to view the machine's configuration information and serial number.。Check whether the serial number is consistent with the serial number on the box。 5. Query activation status: •Visit Apple’s official device protection service page,Enter the machine's serial number to confirm activation status。If it is displayed as new and unactivated,It means your Mac is genuine。 •Web address:Check out Apple Device Protection with these methods,You can feel more confident that your Mac is authentic,And avoid buying products that have been processed by others。
1. Show or hide the menu bar If the menu bar is not displayed,You can display it by following these steps: 1. Open system preferences:Click the Apple icon in the upper right corner of the screen,Select "System Preferences"。 2. Go to general settings:In the System Preferences window,Click "General"。 3. Adjust menu bar settings: •In general settings,Find and check the "Automatically hide and show menu bar" option。 After setting this,The menu bar will automatically hide and show,Display based on your mouse movement or window operation。 2. Adjust menu bar icons •Rearrange icons:Command-drag an icon on the menu bar,Their positions can be rearranged。 •Remove menu bar icon:Hold down the Command key,Then click on the icon you want to delete and drag,until a delete sign appears at the top of the screen。Release the mouse to delete the icon。 please note,The icons of some software may not be removed from the menu bar,This depends on the settings of the software itself。 With these simple steps,You can easily manage and adjust the display and icons of your Mac's top menu bar。
Comments (0)