Special reminder:After the installation is completed and run,Be sure to cancel automatic updates,Otherwise, if a new version is automatically updated, the crack will become invalid.。
Permute can easily convert media files on Mac to various formats。Supports almost all formats,And there are tons of device presets to choose from。
Easy to operate
Permute操作非常简单,Just drag and drop the file into the window。Has a gorgeous interface,Drag and drop simplicity,No need for complicated options。
处理速度快
Permute被处理速度非常快。Just select the video format you want to convert the file to,It will process faster than you think。
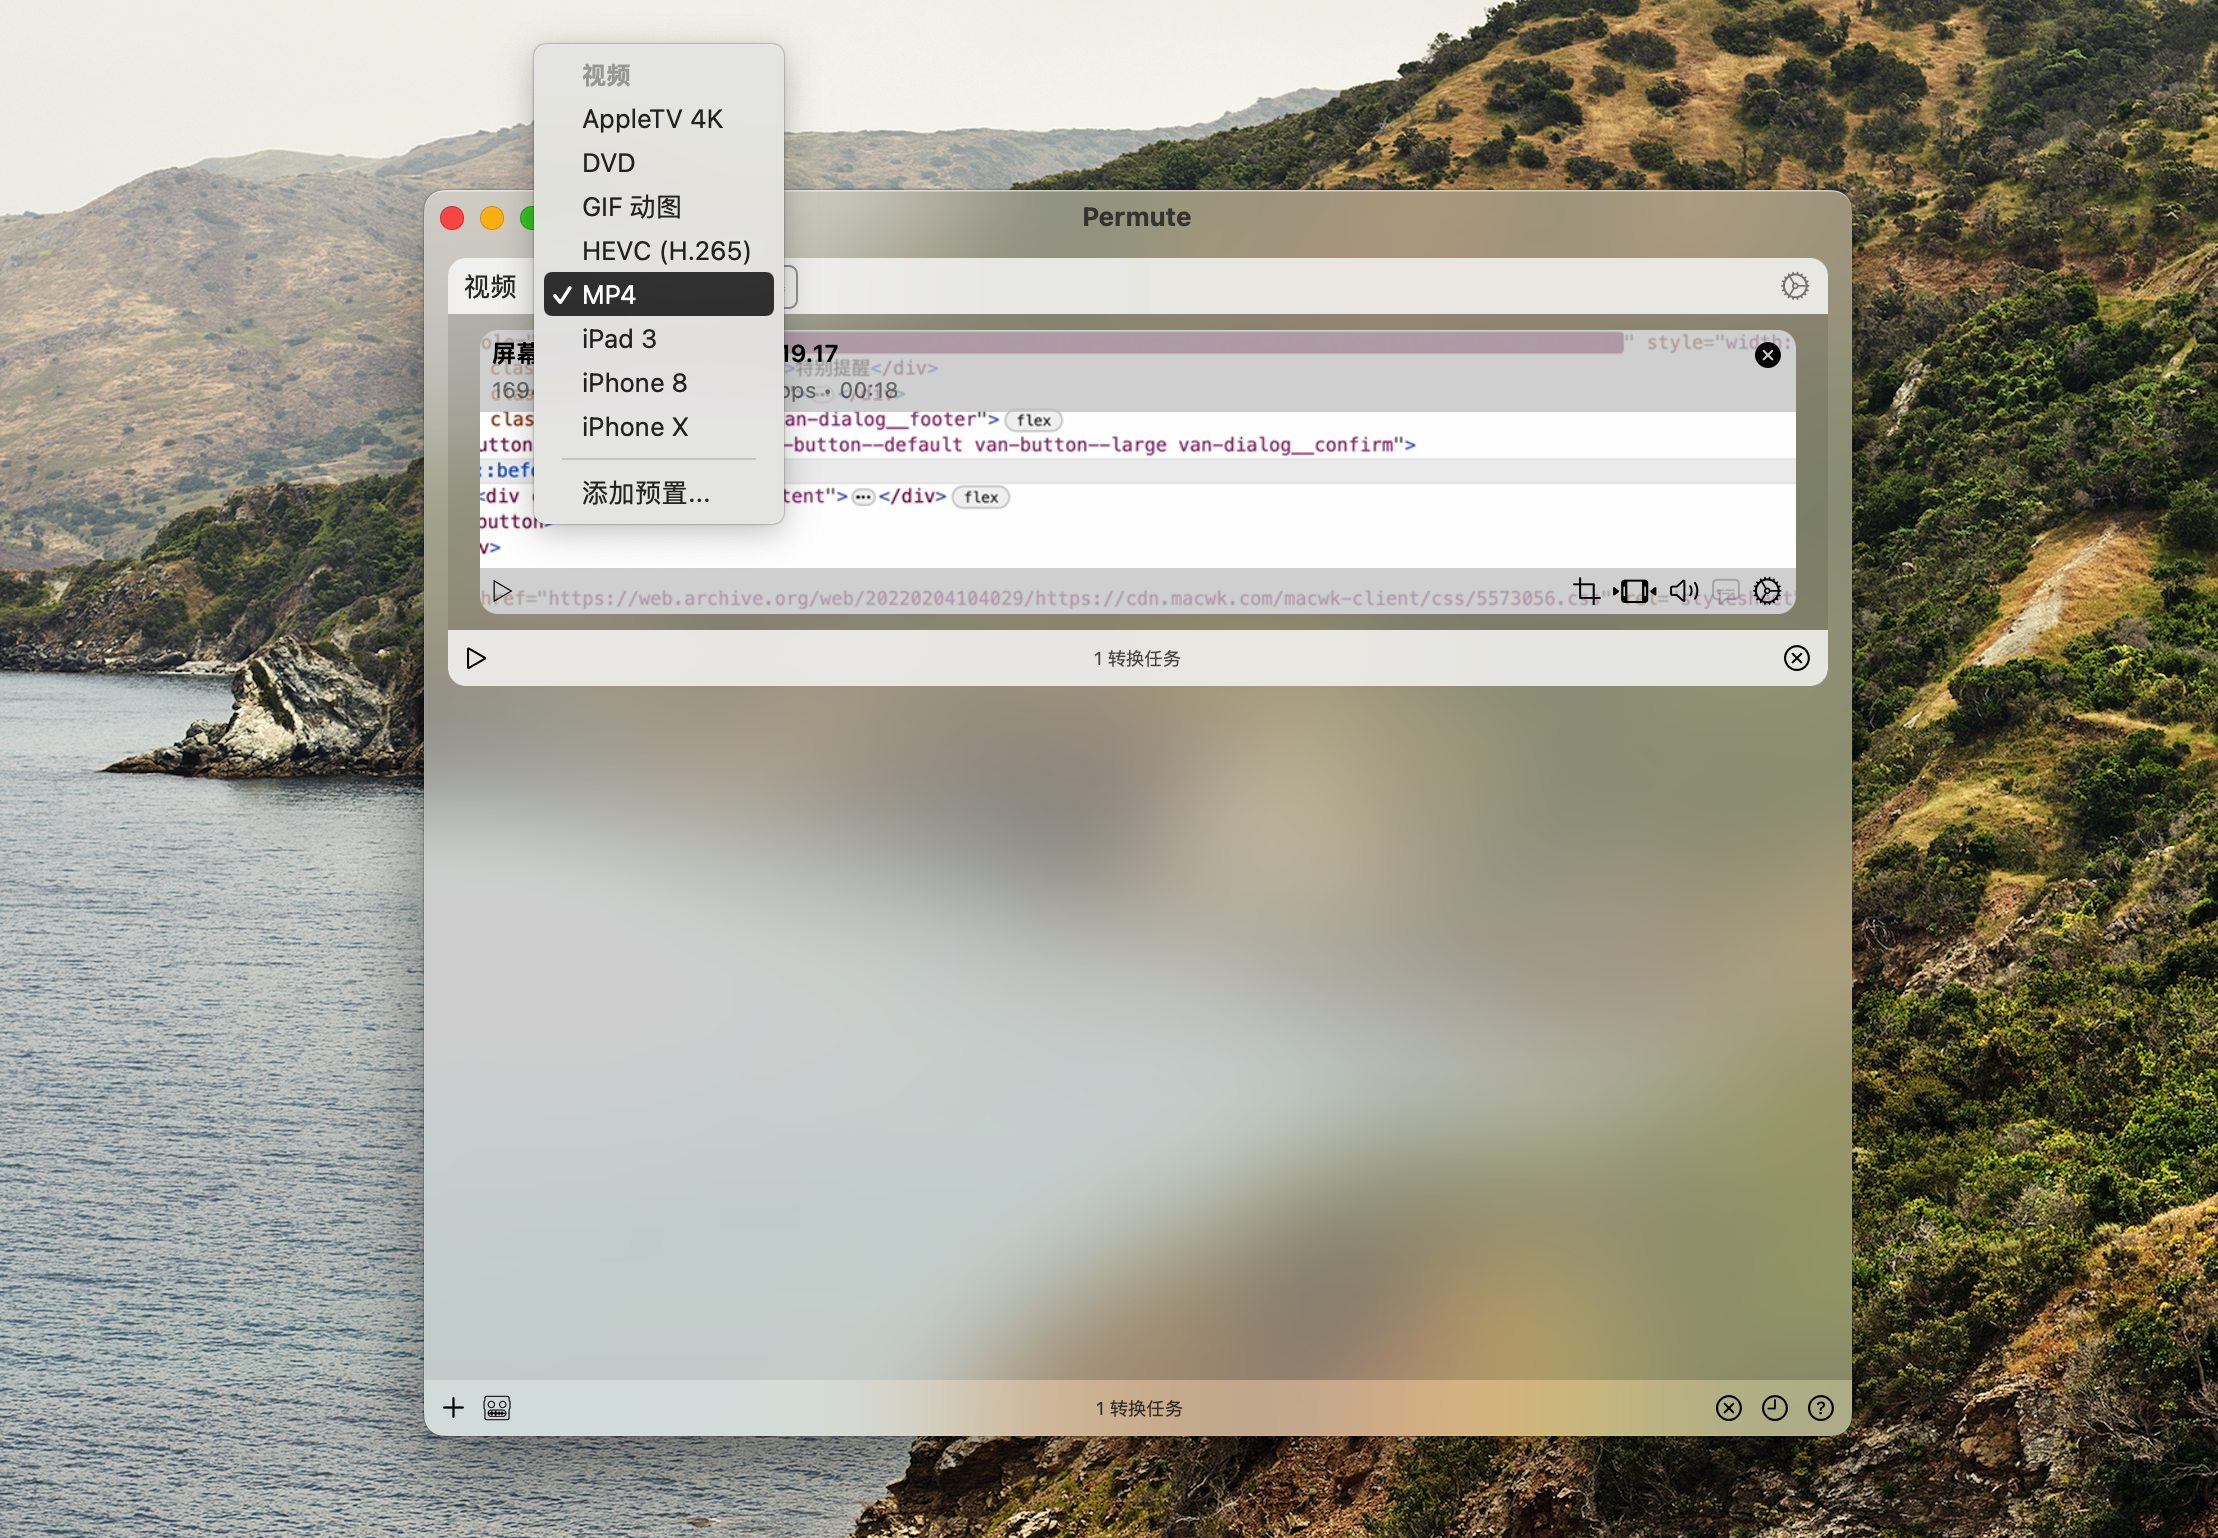
支持所有格式
无论是图片,video,Audio Permute can be converted。Supports almost all formats,And there are tons of device presets to choose from。
statement:All articles on this site,If there is no special instructions or markings,All are originally published by this site。any person or organization,Without the consent of this website,Reproduction prohibited、Misappropriate、collection、Publish content from this site to any website、Books and other media platforms。If the content on this site infringes upon the legitimate rights and interests of the original author,You can contact us for processing。
Can free downloads or VIP membership resources be used directly for commercial use?
The copyright of all resources on this site belongs to the original author,The resources provided here are for reference and study purposes only.,Please do not use it directly for commercial use。If copyright disputes arise due to commercial use,All responsibility lies with the user。For more instructions, please refer to VIP introduction。
It prompts that the download is complete but cannot be decompressed or opened?
The most common situation is an incomplete download: You can compare the capacity of the downloaded compressed package with the capacity on the network disk,If it is less than the capacity prompted by the network disk, this is the reason。This is a browser download bug,It is recommended to download using Baidu Netdisk software or Thunder。 If this situation is excluded,You can leave a message at the bottom of the corresponding resource,or contact us。
Can't find the sample image in the material resource introduction article?
For members only、Whole site source code、Program plug-in、website template、Web page templates and other types of materials,The pictures used for introduction in the article are usually not included in the corresponding downloadable material package.。These related commercial images need to be purchased separately,And this site is not responsible for(There is no way)find source。 The same is true for some font files,However, some materials will have a list of font download links in the material package.。
The download address cannot be displayed or the content cannot be viewed after payment?
If you have successfully paid but the website does not pop up a success prompt,Please contact the webmaster to provide payment information for you to process
After purchasing this resource,Can I get a refund?
Source code materials are virtual goods,replicable,Transmissibility,once granted,No refunds of any kind will be accepted、Exchange request。Please confirm before purchasing to obtain the resources you need.
Comments (0)
Note: Please be respectful and civil in your comments Cancel reply
The startup screen may vary depending on your Mac model、Varies depending on factors such as operating system (macOS)。Some screens, such as the ban sign or question mark, mean you need to solve a problem first,Then the Mac can complete booting。For all Mac models,When you see the Finder menu bar、Desktop and Dock,This means that the startup is complete。today,The editor of MacW will take you to understand what the various interfaces displayed when Mac starts up represent.。 1. Forbidden symbol A circle crossed by a line or slash means that the selected startup disk contains a Mac operating system,But it's not macOS for your Mac。You should reinstall macOS on this disk。 2. Question mark A folder with a question mark means that the selected startup disk is not available,or does not include Mac OS。Learn how to fix problems with flashing question marks。 3. Blank Screen It is normal to have one or more blank screens during startup.。it may be black、grey、blue,It could also be a desktop picture。If no image appears on the screen after a while,Make sure your display is on、Connected and brightness turned up。 4. Apple Logo Your Mac displays the Apple logo after finding the local startup disk,This disk is the Mac's built-in startup disk or is directly connected to the Mac's startup disk。If your Mac cannot find your local startup disk,then it will try to use a network boot disk if one is available。As the boot process continues,You should see a progress bar or indicator showing the circle (which may or may not contain the Apple logo)。This screen may alternate with a blank screen multiple times。 If you're updating or reinstalling macOS,then this stage may take longer to complete。As the installation continues,The progress bar may move slowly and pause for a long time。Find out if your Mac seems to be stuck on this screen during the installation process or just after the installation is complete,what to do。 5. Rotating Earth When using a network boot disk,Your Mac displays a spinning globe instead of the Apple logo。When launching from macOS recovery function over the Internet,There will also be a rotating earth。As the boot process continues,You should see a progress bar,It may alternate with a blank screen multiple times。 6. Earth with warning symbol when your Mac tries to boot from macOS Recovery over the Internet and fails,You may see a globe with an exclamation mark。Your Mac may not be able to connect to the internet,Or it might be using a network configuration that's incompatible with macOS recovery features。Please try the following solutions: – Use Command-R on startup to try to use the built-in macOS recovery system,Rather than booting from macOS recovery over the Internet。 – Connect to the Internet using Ethernet instead of Wi-Fi,vice versa。 – Connect to the Internet from another network。 – Please try again later,Because the problem may be temporary。 7. Lock icon If your Mac uses a firmware password,then when you try to download a file from another disk or volume such as,external drive or macOS recovery) a lock icon appears when starting。Please enter your firmware password to continue。 8. PIN code to lock your system if your Mac is locked remotely via the Find My feature,then your Mac will ask for a PIN。Please enter a four-digit or six-digit password to continue。 9. Login window In the login window,Enter your user account password,to log into your Mac。If FileVault is open,then this action will also unlock your disk。You may see the default desktop picture in the background,After you select your account,This image may be changed to a desktop image of your choice。 By understanding these launch screens,You can better solve problems you encounter when your Mac starts up,Make sure your Mac starts up smoothly and works normally。
Optimized content: Microsoft Outlook 2019 for Mac is Office launched by Microsoft 2019 One of the components,Outlook 2019 Mac is an email and calendar tool,Can be used to send and receive emails、Schedule、Manage contact information、Take notes etc.。So,How do you find items by performing a basic search in Outlook for Mac? Next,Follow the editor to see the specific tutorial! Perform a basic search in Outlook You can use the search box on the toolbar to search within the current folder or view。 1. Go to the folder or view you want to search:For example "mail"、"Calendar" or "People"。 2. Enter search terms in the search box:Enter your search terms in the search box in the upper right corner of the Outlook window。Outlook will display search results on the Search tab。 •To conduct a comprehensive search across all Outlook files (regardless of folders or views),Please select "All Projects"。This option is available in all views。 •Every time you switch views,You need to re-enter your search terms。 3. Select search scope:You can choose where to search based on folders or views。Available options include: •mail:current folder、subfolder、All messages or all items。 •Current email:Search within the currently selected mailbox。 •calendar:current folder、all events or all projects。 •Contact person:current folder、All contacts or all projects。 •Task:current folder、All tasks or all projects。 •notes:current folder、All notes or all items。 4. Complete search:After viewing the search results,Click Close Search on the Search tab。 •Notice:If you don't click "Close Search",The Search tab will remain active,The project list will continue to show search results,Even if you click on other tabs (like the Home tab)。 •Outlook...
On a Mac computer,By default, the mail client does not have the QQ mailbox option。If you need to use QQ mailbox,You need to add it manually。The following are the specific steps: 1. Open your mail client •Open your Mac computer,Find and open your mail client。 2. Select Add Account •On the email client page,Click "Mail" on the toolbar in the upper left corner,Select "Add Account..."。 3. Select QQ mailbox •Find and click QQ mailbox in the pop-up page。 4. Enter account information •In the pop-up email information window,Enter your email address and password,Click the "Login" button。If it prompts an error,Please follow the steps below to proceed。 5. Obtain the QQ mailbox authorization code •Open the web version of QQ mailbox,Click the "Settings" option above,Then select "Account"。 6. Start the service and obtain the authorization code •Find “Start Service”,Select "On",And follow the prompts to send a verification text message using your mobile phone.。After sending is completed,Click the "I Sent" button。 7. Enter the authorization code •Copy the authorization code shown on the left into the password box of your email client,Just click the "Login" button。 go through these steps,You can successfully add QQ mailbox in Mac mail client。
Many friends who use macOS will encounter a common problem after installing Paragon NTFS.:Disk can only read,Unable to write。They all reflected:"There is nothing wrong with my disk,Paragon NTFS has been activated successfully,No problem。” Actually,This may be because the user accidentally checked "read-only mode" during installation。 reason: Users may have mistakenly selected "read-only mode" when installing Paragon NTFS.。 Solution: Just uncheck the "read-only mode" option,Then ejecting the disk and reinserting it solved the problem。 Paragon NTFS software installation package download
XMind is a powerful mind mapping software,But sometimes the file may be damaged and cannot be opened.。Here are the steps to resolve this issue: Open the XMind app: Start XMind software。 Enter file cache: Select "File" in the menu bar。 Click on the File Cache option。 Select the files that need to be recovered: in file cache,Find and select the files that need to be recovered。 Recover files: Click the "Retrieve" button,to recover selected files。 Reopen file: After recovery is complete,Try reopening the XMind file,Check whether you can access and edit normally。 These steps can often help you recover XMind files that cannot be opened due to file corruption。Make sure to back up important files before proceeding,To prevent unexpected situations from happening。 If the above methods cannot solve the problem,You may want to consider using XMind's backup files or contact XMind's support team for further assistance and support。 through these methods,You can effectively deal with XMind file corruption issues,Make sure you continue to use this great mind mapping software effectively。
MacCleaner Pro is a professional Mac cleaning tool suite software,Keep your Mac fast、clean and orderly,Helps you see what's taking up the most space on your Mac,Unnecessary files found,and reclaim hard drive space。It can clean junk files in one click、Optimize RAM、Manage extensions and fix issues,Make your Mac run faster。MacCleaner Pro is packed with features,For example cleaning invalid RAM memory、Disable startup programs、Reindex Spotlight and Mail、Remove unnecessary plugins and extensions、Close memory-intensive apps、clear cache、Delete installation files and unnecessary localization files, etc.。also,MacCleaner Pro also offers several additional tools,Such as App Cleaner & Uninstaller、Duplicate File Finder和Disk Space Analyzer,Help you perform deep cleaning。MacCleaner Pro user feedback is positive,Recommended by many users。
Many Mac users may not know,Mac computers have a hidden screen-rotating feature。by rotating the screen 90 degree,You can read e-books or movies while lying down。So,How to rotate the screen on a Mac computer? Let me share with you the specific method below,Let’s take a look together。 1. Open System Preferences •Click on the Apple icon in the upper left corner,Choose to enter System Preferences。 2. Go to monitor settings •In System Preferences,Click on the "Display" option。 3. Select the rotation angle •In the monitor settings interface,Find the "Rotate" option。There are three rotation angles to choose from in the drop-down menu:90 degree、180 degree and 270 degree。After selecting the desired rotation angle,Exit settings to complete。 Notes •If you don’t see the “Rotate” option in your monitor settings,It may be that your computer does not support the screen rotation function。 Go through the above steps,You can easily rotate your Mac screen,Bring more convenience to your use。
The navigation area at the bottom or sidebar of Apple's Mac computers is called the "Dock" or "Dock"。If you use certain software frequently,You can put them on the Dock,for quick start。If you no longer need certain software,It can be removed from the Dock。Let’s take a look at how to add or remove applications on the dock in Mac systems。 Add software to the Dock Method 1: 1.Click on the black rocket icon (Launchpad) in the Dock。 2.Launch an application you want to keep in the Dock。 3.After the software starts,Its icon will appear in the Dock。Right click on the icon,Select "Options" -> "Keep in Dock"。 Method two: 1.Open Launchpad (can be opened by clicking the rocket icon in the Dock)。 2.Find the software you want to add to the Dock,Long press the app icon。 3.Drag the app icon to the appropriate location on the Dock,to pin it to the Dock。 Method three: 1.Open the Finder,Click on the "Applications" folder in the left sidebar。 2.Find the software you want to add to the Dock in the Applications folder。 3.Drag the software icon directly to the dock。After placing,The app will automatically reside in the Dock。 Delete software on the dock 1. Move the mouse cursor to the application icon in the dock that needs to be deleted。 2.Press and hold the app icon,Drag to an area of the desktop outside the Dock,until the "Remove" prompt appears。 3.Release mouse,The app icon will be removed from the Dock。 Notice:Removing an app icon from the Dock does not uninstall or delete the app,Just remove it from the Dock,The application remains in your Applications folder。 Through the above methods,You can easily manage apps in the Dock,Add frequently used apps or delete app icons you no longer need。Hope these steps are helpful!
Powerful code editing function VS Code provides powerful code editing function,Supports multiple programming languages and file formats。It can intelligently prompt、code completion、syntax highlighting、code folding、Multi-cursor editing and other functions。also,VS Code also supports customizing code formatting and code style through configuration files。 Supports multiple programming languages VS Code supports multiple programming languages,Includes JavaScript、TypeScript、Python、Java、C++、C# etc.。Users can install corresponding extensions as needed to extend the functions of VS Code。 Rich debugging functions VS Code provides rich debugging functions,Code debugging can be performed by configuring the debugging environment。It supports single-step execution、skip current line、Continue execution and other debugging functions,Can help users quickly locate problems in the code。 Support Git version control VS Code has built-in Git version control tool,Version management can be easily performed。Users can perform Git operations through the Git menu or command panel,For example, submit code、View version history and more。
Cookies can help you view and clear cookies in all installed browsers with one click、History、cache,And can prevent website cookie tracking,Improve protection of personal data privacy。 Cookies are the only cookie manager that gives you complete control over your privacy。 Cookies prevent third parties from hijacking your browsing experience。 in your browser,Websites you visit without your knowledge or consent。some are beneficial,But others are frustrating and invasive。Cookies can help。 More privacy,Better browsing Automatic privacy controls。Set a timer,Delete it when you exit your browser,It's entirely up to you when you delete your private browsing data。 strengthen security。Securely delete any unwanted data,And it’s easy to know that external threats cannot recover your private data。 Avoid intrusive marketing。Tired of targeted ads,Secretly know what products you are shopping for online?Eliminate cookies。 Stay away from flash and Silverlight。Cookies are good at eliminating Flash and Silverlight cookies,Especially large and persistent types of cookies。 Impressive results,minimal effort。By combining all cookie controls into a simple interface,Cookies make maintaining your browsing privacy a breeze。
Many friends may need to switch the language of the software from Chinese to English when using Photoshop.。The following are the specific steps: Open the Photoshop folder in the application: Find and open the folder of your installed version of Photoshop (e.g. Adobe Photoshop CC 2020)。 Go to the Locales folder: Find and enter the "Locales" folder in the Photoshop folder。 Enter the zh_CN folder: Find and enter the "zh_CN" folder in the Locales folder。 Go to the support files folder: Find and enter the "support files" folder in the zh_CN folder。 Modify file name: Find the file named "tw10428_Photoshop_zh_CN.dat",Change its file name to any other name,For example, add ".bak" suffix to the file name。 Rerun Photoshop: After modifying the file name,Restart the Photoshop application。 Confirm to switch to English version: Now,Adobe Photoshop CC for Mac should have switched to the English version。 With these simple steps,You can easily switch the interface language of Adobe Photoshop from Chinese to English,to suit your personal preferences and work needs。
Data Guardian is a very good Mac data encryption software on the Mac os platform,It is a data protection software produced by Koingo Software Inc.,Or call it data encryption software,In fact, it is essentially a password management software,Very high performance。 Data Guardian is a secure database application。Security and privacy are two of the most important issues in today's world;Leaving passwords on a sticky note on your computer will no longer be deleted。Data Daemon is a secure database application,With up to 448-bit Blowfish encryption – no matter how sensitive your data is。Create multiple databases in Data Guardian,for various purposes,Such as address book、customer database、Christmas shopping list、log、Password manager,Even a notepad。 Categories can be easily created to store records,You can even apply custom color labels and icons!Change view options for each category,to view the information you want,Even add your own custom data fields。Don’t get stuck with a program that forces you to enter your information into predefined fields。Enter the data you need,rather than forced data。 Beyond Data Guardian makes it easy to use Keychain integration to autofill passwords on websites,It also provides various other tools and features to enhance every record。Via your modem with one click,Create new email message,Generate secure passwords(Based on the algorithm you choose),Even sync two databases。
Comments (0)