Ghost Buster Pro is a powerful Mac cleaning tool,Can help you free up disk space、Improve computer performance and protect your privacy。
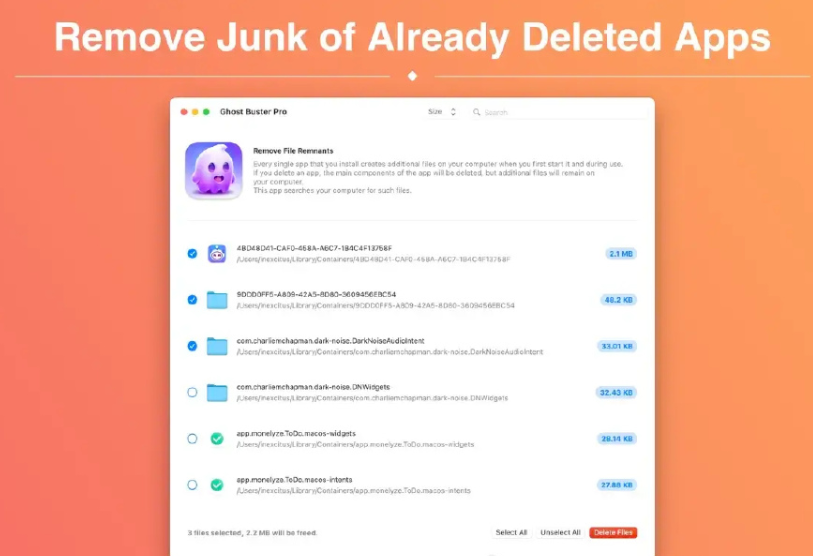
Ghost Buster Pro is an app for cleaning up your Mac computer。It can scan your computer,Find and delete unused files、cache、Temporary files and other junk files。Ghost Buster Pro can help you free up disk space、Improve computer performance and protect your privacy。
Main functions:
Scan and delete junk files: Ghost Buster Pro can scan your computer,Find and delete all kinds of junk files,include: 不使用的应用程序 缓存文件 临时文件 旧的下载文件 日志文件 系统垃圾 Free up disk space: Ghost Buster Pro can help you free up a lot of disk space,Gives you more space to store important files。 Improve computer performance: Deleting junk files can improve your computer's performance and speed。 protect privacy: Ghost Buster Pro can delete sensitive files,Protect your privacy。
statement:All articles on this site,If there is no special instructions or markings,All are originally published by this site。any person or organization,Without the consent of this website,Reproduction prohibited、Misappropriate、collection、Publish content from this site to any website、Books and other media platforms。If the content on this site infringes upon the legitimate rights and interests of the original author,You can contact us for processing。
Can free downloads or VIP membership resources be used directly for commercial use?
The copyright of all resources on this site belongs to the original author,The resources provided here are for reference and study purposes only.,Please do not use it directly for commercial use。If copyright disputes arise due to commercial use,All responsibility lies with the user。For more instructions, please refer to VIP introduction。
It prompts that the download is complete but cannot be decompressed or opened?
The most common situation is an incomplete download: You can compare the capacity of the downloaded compressed package with the capacity on the network disk,If it is less than the capacity prompted by the network disk, this is the reason。This is a browser download bug,It is recommended to download using Baidu Netdisk software or Thunder。 If this situation is excluded,You can leave a message at the bottom of the corresponding resource,or contact us。
Can't find the sample image in the material resource introduction article?
For members only、Whole site source code、Program plug-in、website template、Web page templates and other types of materials,The pictures used for introduction in the article are usually not included in the corresponding downloadable material package.。These related commercial images need to be purchased separately,And this site is not responsible for(There is no way)find source。 The same is true for some font files,However, some materials will have a list of font download links in the material package.。
The download address cannot be displayed or the content cannot be viewed after payment?
If you have successfully paid but the website does not pop up a success prompt,Please contact the webmaster to provide payment information for you to process
After purchasing this resource,Can I get a refund?
Source code materials are virtual goods,replicable,Transmissibility,once granted,No refunds of any kind will be accepted、Exchange request。Please confirm before purchasing to obtain the resources you need.
Comments (0)
Note: Please be respectful and civil in your comments Cancel reply
Many friends may need to switch the language of the software from Chinese to English when using Photoshop.。The following are the specific steps: Open the Photoshop folder in the application: Find and open the folder of your installed version of Photoshop (e.g. Adobe Photoshop CC 2020)。 Go to the Locales folder: Find and enter the "Locales" folder in the Photoshop folder。 Enter the zh_CN folder: Find and enter the "zh_CN" folder in the Locales folder。 Go to the support files folder: Find and enter the "support files" folder in the zh_CN folder。 Modify file name: Find the file named "tw10428_Photoshop_zh_CN.dat",Change its file name to any other name,For example, add ".bak" suffix to the file name。 Rerun Photoshop: After modifying the file name,Restart the Photoshop application。 Confirm to switch to English version: Now,Adobe Photoshop CC for Mac should have switched to the English version。 With these simple steps,You can easily switch the interface language of Adobe Photoshop from Chinese to English,to suit your personal preferences and work needs。
1. Quickly hide and show the Dock using the shortcut Command + Option + D,Easily hide or show the application icon bar below the desktop。 2. Invert screen colors using shortcut Command + Option + Control + 8,Switch the screen's color for a better nighttime experience or to accommodate visually impaired users。 3. Quickly view and manage running applications Command-click Tab,Ability to quickly scroll through currently running applications。at the same time,Use Command + Q Quickly exit the current application,Use Command + H Minimize application window。 4. To display the Apple logo, hold down Option in any application + Shift + K,You can type Apple Logo characters。 5. Quickly manage the Trash using Command...
In our daily design work,such as advertising、Photography watermark、quotation、album cover、book cover、product design、sign、business card、logo、brand、Magazine and social media copywriting, etc.,Choosing the right font is crucial。Let’s learn how to install fonts on Mac。 Mac font installation tutorial Download font files: First make sure you have downloaded the required OTF (OpenType Font) or TTF (TrueType Font) font file。 Method one:Install using Font Book Open "Font Book" on your Mac: Find and click the "Font Book" app in the launcher。 Add font: In the menu bar of the font book,Select "File" > "Add font"。 Or directly click the "+" button above the font book window。 Navigate to the font file location: Find the font file you downloaded,and click "Open"。 Complete installation: Mac automatically installs selected font files,After the installation is complete, the font can be used in the application.。 Method two:Double-click to install. Double-click the downloaded font file directly.。 In the font preview window that opens,Click "Install Fonts"。 Follow the simple steps above,You can easily install and use your favorite fonts on your Mac,to highlight your design style。
Rectangle is a window management application on the Mac platform,Windows can be moved and resized in macOS using keyboard shortcuts。 Rectangle is a window manager,Based on Spectacle application,Written in Swift,Allows users to move and resize windows using keyboard shortcuts。 Window management and resizing are very useful when used in development,When your desktop is cluttered,When the window is open a lot,Necessary adjustments can improve your productivity。Window resizing for individual apps,To get the best experience。
QuickRecorder is a versatile、Lightweight and high-performance open source macOS screen recording tool。It focuses on screen recording,Provide sophisticated but not excessive functionality,Just to give you the best experience。Based on ScreenCapture Kit interface,QuickRecorder supports multiple recording modes,including screen、application、window etc.。It can also perfectly record system sounds without driver.,No need to rely on third-party drivers (the driver-free audio internal recording function is only available for macOS 13 and above systems)。QuickRecorder fully supports the "speaker front" feature set,You can enjoy system-level real-time camera keying overlay and special effects processing (this feature is only available for macOS 14.2 and above systems)。Behind every small function, there are ingenious thoughts specially considered for you.,Everything is designed to make screen recording easier。please note,This tool only supports macOS 12.3 and above systems。 Features Focus on screen recording QuickRecorder is inherently simple and pure, Concentrate on screen recording. Expensive functions but not too expensive, Only the best is given to you. Record whatever you want. Based on the powerful functions provided by the ScreenCapture Kit interface., QuickRecorder supports multiple recording modes such as screen/application/window, etc. You can capture the sound and picture with both hands and enjoy the perfect driver-free internal recording system sound., Say goodbye to third-party drivers. (The driver-free audio internal recording function only supports macOS 13 and above systems) The focus of the audience, Appear at any time QuickRecorder is now fully supported [speaker front] feature set, Enjoy system-level real-time camera keying overlay and special effects processing. (Speaker front-facing feature only supports macOS 14.2 and above systems) It’s all about the details. Behind every small function, there is an ingenuity specially considered for you., Everything is just to make screen recording easier
Mac actually supports native NTFS reading and writing functions,But this function is hidden,But it can be turned on manually。but,Many new users don’t know exactly how to operate。Here's how to turn on macOS's native NTFS read and write capabilities,Hope it helps everyone。 step one:Open the terminal 1. Click the magnifying glass button in the upper right corner of the desktop (Spotlight search)。 2.Enter "terminal" in the search box that pops up and press Enter.。 Step 2:View partition information 1. Enter the following command in the terminal to view the volume labels of all partitions: diskutil list step three:Edit the configuration file 1. Enter the following command to open the configuration file (administrator rights are required): sudo nano /etc/fstab 2. The system will prompt you to enter the administrator password,After typing, press the Enter key (note:characters will not be displayed when entering the password)。 Step 4:Add NTFS partition configuration 1. Configure the NTFS partition label according to your needs,Enter the following configuration information: LABEL=YOUR_NTFS_VOLUME_NAME none ntfs rw,auto,nobrowse Replace YOUR_NTFS_VOLUME_NAME with your NTFS partition volume label name。 2.After input is completed,Press Control+X to exit the editor。 3. Press Y to confirm saving changes,Then press Enter to complete the configuration。 After completing the above steps,Re-insert the NTFS formatted hard drive to enable read and write operations。Hope these steps can help you enable NTFS reading and writing functions on macOS。
Special reminder:After the installation is completed and run,Be sure to cancel automatic updates,Otherwise, if a new version is automatically updated, the crack will become invalid.。 Permute can easily convert media files on Mac to various formats。Supports almost all formats,And there are tons of device presets to choose from。 Simple operation Permute operation is very simple,Just drag and drop the file into the window。Has a gorgeous interface,Drag and drop simplicity,No need for complicated options。 Fast processing Permute is processed very quickly。Just select the video format you want to convert the file to,It will process faster than you think。 Support all formats whether it is pictures,video,Audio Permute can be converted。Supports almost all formats,And there are tons of device presets to choose from。
Logic Pro for Mac is a powerful, full-featured music app,Comes with all the tools you need to create professional-quality music。you can record、Arrange and edit audio and MIDI regions,Add high-quality effects,Mix music into stereo or surround sound,The final mix is then exported to various formats for distribution。 You can create many different types of projects using Logic Pro,Suitable for everything from simple music to complex ensemble arrangements。Logic Pro for Mac gives you the flexibility to customize the app to fit the way you work。 Functions that Logic Pro can implement include: Record vocals、Instruments or any sound that can be captured by a microphone,Includes recorded footage and composition。 Use a USB keyboard or other MIDI controller,Play and record software instruments included with Logic Pro for Mac。You can also play and record third-party audio unit software instruments。 Add virtual drummer to project,to create detailed、Realistic virtual drum performance,and according to genre、Dynamically adjust project content and other parameters。 Add Apple Loops and other media files to your project。 Arrange regions containing musical material in the Tracks area。You can also define parts of your project and use arrangement markers to quickly rearrange them。 Use a set of editors optimized for different tasks and clip types,Edit audio and MIDI regions。 Edit audio clip、single note、Timing and pitch of chords and sounds。 Mix your project in the mixer,where you can view and edit channel strip controls,Custom sending options,and add and edit plugins。 Using Holistic Recovery Mix Automation,make mix、Effect and plug-in settings change automatically over time。You can record automation changes in real time,and edit them later。 Controls include speed、Transposition and global settings including time signature and key signature to adjust the entire project。Use markers to define and quickly move to different parts of your project。 View MIDI regions in your project as scores,Add and edit notes and other musical symbols,and print the finished score as well as individual parts。
The Dock is the taskbar on your Mac that holds shortcuts to frequently used applications and folders,Gives you easy access to frequently used features and files。Mastering the setting skills of the Dock bar can significantly improve work efficiency。The following is a comprehensive explanation of the Dock bar setting techniques.: Change size and position 1. Open system preferences: •Click on the Apple icon on the desktop,Select "System Preferences",Then click "Dock"。 2. Adjust size and position: •Move the mouse to the dividing line of the Dock bar,Do the following: •Click and drag to resize the Dock。 •Shift-click-drag to change the position of the Dock。 •Right-click an empty area in the Dock,You can choose to show or hide、Turn off options such as magnification effects。 Add applications and folders 1. Add application: •Open the Applications folder,Find the app you want to add。 •Tap the application icon,Drag it to the Dock to add。Folders can be added to the right of the dividing line。 •Drag application icons to rearrange their order in the Dock。 2. Keep apps in use: •If the application is using,Right-click on its icon in the Dock,Select "Keep in Dock"。 Remove applications and folders...
Special reminder: 1、Be sure to completely uninstall the previous version before installation。 2、Do not open CrossOver after installation。 3、First run CrossOver crack in DMG to activate it.。 CrossOver Mac offers a treat for users familiar with Wine,Allows them to run programs made for Microsoft Windows without actually having to install the Windows operating system。This application contains software libraries optimized for Windows programs,in it,You can run e.g. Microsoft Word、Excel、Many common applications such as Quick and Windows Media Player,But you need to configure the program yourself to install any application。It creates a Windows runtime environment called a "bottle" for installed programs,Including their respective C drives、Subdirectories and registries。Since CrossOver Mac is not a true virtual environment,So you can run your application faster,But it cannot provide a real Windows experience,And software that is not supported by Wine may not be able to run or may run unstable.。 Features Support for a wide range of Windows applications CrossOver can run many commonly used Windows applications,Includes Microsoft Office、Photoshop、Steam etc.。And it doesn’t require a Windows operating system to be installed,Therefore, many tedious operations can be saved。 Automatically Set Up Applications CrossOver automatically sets up applications,Make it run correctly on macOS。It automatically installs required Windows components and libraries,to ensure the application runs smoothly。This eliminates the need for users to worry about whether the application will run correctly。 Fully supports macOS system CrossOver fully supports macOS system,Including the latest....
Firewall can effectively protect your Mac computer from unauthorized network access。Here are the steps to turn on and configure the firewall on your Mac computer。 step one:Open System Preferences 1. Click the Apple icon in the upper left corner of the screen,Select "System Preferences"。 Step 2:Go to Security & Privacy 2. In System Preferences,Click "Security & Privacy"。 Step 3:Unlock settings 3. Click the lock icon in the lower left corner,and enter the administrator password to unlock settings。 Step 4:Open the firewall 4. Select the "Firewall" tab,Click the "Turn on firewall" button。 Step 5:Configure the firewall 5. Click the "Firewall Options..." button,Make further configuration。You can choose to allow or block network connections for specific applications。 Step 6:Complete the settings 6. After the configuration is completed,Click "OK" to save settings。 Summary Through the above steps,You can easily turn on and configure your Mac computer’s firewall,Enhance system security。
The following are some commonly used tips and practical functions about Word Mac: one、Commonly used techniques 1. Remove spaces with one click •Use shortcut keys or find and replace function to delete spaces in documents in batches,For example: •shortcut key:Ctrl + H,Then enter "^w" in the Find what box,Click "Replace All"。 2. Delete blank lines with one click •Delete blank lines in the document,The steps are as follows: •shortcut key:Ctrl + H,Enter "^p^p" in the Find what box,Replace it with "^p",Click "Replace All"。 two、Practical Tips 1. Delete headers with one click •Use shortcut keys to quickly delete headers,For example: • shortcut key:Ctrl + Shift + N。 2.One-click cutout •Perform image processing and cutout operations in Word: •After inserting a picture,Select the "Format" tab,Then click "Remove Background",Select the parts you want to keep or delete,Press Enter to complete the operation。 3. Split text with one click • Split text into columns to improve layout: •After selecting text,Go to the "Page Layout" tab,Select "Column",Then select "Two Columns"。 With these tips and features,You can process and manage your documents more efficiently,Improve work efficiency。Remember to save documents regularly,And keep your documents safe with password protection。
Comments (0)