Keka is a free macOS file decompression program,Can meet your daily decompression needs,Small size,Simple and easy to use,faster。The main compression core is p7zip (7-zip port)。
Support compressed formats:7z,Zip,Tar,Gzip,Bzip2,DMG,ISO
Supported extraction formats:RAR,7z,Lzma,xz,Zip,Tar,Gzip,Bzip2,ISO,EXE,CAB,PAX
Detailed instructions for installing KeKa 1.6.1
1.Download ready installation package
➡️ Installation package download:First download the KeKa 1.6.1_MAS_TNT.dmg file to your Mac,Usually found in the "Downloads" folder。
➡️ Make sure the file is not damaged,The sizes are almost right (don’t let the lower half break)。
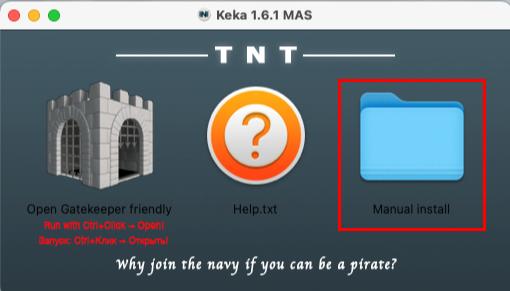
➡️ Double-click to open the DMG file above,The following window appears,Click the Manual button to enter the Manual install folder,There is the KeKa 1.6.1_MAS_TNT.dmg file inside。
2.Start installation
➡️ Double-click to open the .dmg file,Find your KeKa 1.6.1_MAS_TNT.DMG file,double click on it,A window will pop up,There is usually a KaKa icon and an "Applications" folder icon.。
➡️ KeKa 1.6.1 Drag the icon into Applications,Put the KeKa on the left Icon (or other display KeKa 1.6.1 icon),Use mouse directlyDrag and drop to the “Applications” folder icon on the right,Just like putting a file into a folder。👉 This step is equivalent to installing the software into your computer。
(If a pop-up prompt says "Unable to verify developer",Don't panic,Continue reading below)
➡️ Handling "Cannot verify developer" prompt (common situation)macOS may pop up a window saying that this app is not from the App Store,not safe,Asking if you want to open it。You can do this:
FirstHold down the Control key,Then click on that KeKa 1.6.1 icon,Select"Open";
Or go[System Settings]→[Privacy and Security]→[Security]There,You will see a prompt saying that an app is blocked,Click"Still open" That’s OK。
➡️ Wait for copy to complete,After dragging it over,The system will automatically copy the software to your application folder,Just wait until the progress bar runs out or the prompt is complete.。
3.KeKa 1.6.1 does not require activation,Use it directly after installation。
Most of the download resources on this site are collected from the Internet,Only for learning and communication purposes,Copyright belongs to the original author。If you need to use non-free software or services,Please purchase genuine licenses and use them legally。If the content published on this site infringes upon your rights,Please contact the webmaster to delete,We will handle it promptly。
If the download address is invalid,You can leave me a message,The editor saw the news,Will update the link as soon as possible! Thanks!